|
Updated September
8th 2006
I have been
using this string-pano-head for years (since sometime in 1998) however
credit for the term "Virtual Panohead" should go to Philippe
Hurbain, who not only have created a fantastic tutorial for this
process on his website, but also have a tutorial for photographing arial
p,anoramas, he is truely a outstanding photographer and creator of technical
solutions.
Once you read
this text, I suggest taking a look at my video about the same technique,
it will help you understand how to do this easy panorama solution. Click
to see video.
Naturally process
this does not replace products such as the Kaidan panoheads, or my travel
bracket for spherical panoramas. But it does allow you to capture
a panorama in a pinch. And that is what counts... Right...?
When photographing
multible images for stiching later in a software program, the most important
part is that the images are all taken the same way, with a level camera,
and maybe most important, captured while rotating the camera around
the nodal point of the capture lens.
 When
you use the travle pano barcket, it will fix the camera vertically and
lock the rotation around the nodal-point, the result is perfect captures
which stich very easy. However while holding a camera by hand this gets
a little more tricky. we need to ensure 3 things happens correctly at
the same time. first the camera must be perfectly level, then it should
be at the same height over the ground as the previous exposure, and
finally it should be fixed to a hodal point rotation. When
you use the travle pano barcket, it will fix the camera vertically and
lock the rotation around the nodal-point, the result is perfect captures
which stich very easy. However while holding a camera by hand this gets
a little more tricky. we need to ensure 3 things happens correctly at
the same time. first the camera must be perfectly level, then it should
be at the same height over the ground as the previous exposure, and
finally it should be fixed to a hodal point rotation.
 This
is how this is done, first you need to get a two way bubble level from
your local camera dealer, it is a clear piece of acrylic which ahve
two bubble levels inside, you mount this sideways in your cameras hot
shooe. By holding the camera at about chest level you can see both levels
from above and when both levels are centered the camera is level and
ready to capture the image, second we need to have the camera at a fixed
height, you do that by tying a string around the lens with a small weight
at the end, the weight should barely clear the ground, then you know
that you have the same height for all the exposures. Finally to make
sure you are actually rotating the camera around the nodal point, you
place the string in the appropiate nodal point for the lens you are
using, place a coin on the ground and then keep the weight on the string
centered over the coin. Now you know that your camera are not drifting
sideways, it have the same height for each image captures and it is
level both ways for each image so that they will stich easily. This
is how this is done, first you need to get a two way bubble level from
your local camera dealer, it is a clear piece of acrylic which ahve
two bubble levels inside, you mount this sideways in your cameras hot
shooe. By holding the camera at about chest level you can see both levels
from above and when both levels are centered the camera is level and
ready to capture the image, second we need to have the camera at a fixed
height, you do that by tying a string around the lens with a small weight
at the end, the weight should barely clear the ground, then you know
that you have the same height for all the exposures. Finally to make
sure you are actually rotating the camera around the nodal point, you
place the string in the appropiate nodal point for the lens you are
using, place a coin on the ground and then keep the weight on the string
centered over the coin. Now you know that your camera are not drifting
sideways, it have the same height for each image captures and it is
level both ways for each image so that they will stich easily.
 There
are two relevant nodal-points on the E-10 & E-20 cameras, the one
is if you use the build in zoom lens, set to 35mm (as wide as possible),
the other is when using the Olympus add-on lens giving you effectively
a 28mm lens. when using the add-on wide angle you place the string right
in front of the flange for the lens-hood. When using the 35mm build
in lens, you place the string right behind the focus ring. There
are two relevant nodal-points on the E-10 & E-20 cameras, the one
is if you use the build in zoom lens, set to 35mm (as wide as possible),
the other is when using the Olympus add-on lens giving you effectively
a 28mm lens. when using the add-on wide angle you place the string right
in front of the flange for the lens-hood. When using the 35mm build
in lens, you place the string right behind the focus ring.
Numerical values
for the E-10 and E-20 nodal-points.
Standard lens, wide angle setting (9 mm) = 68mm (~2.677")
Wide Angle lens (WCON8) = 94mm (~3.7")
Both numbers is the distance the nodalpoint is forward of the tripod
socket.:
My panorama
from Nui Bay in Thailand
was captured using this technique, and it a typical exsample of realizing
that I should have brought a tripod and a pano head....
Getting
the most out of your frames
Most of us who
are interested in panorama photography have at some point shot panoramas
"straight handheld", and the results probably came out very
nicely. So with that in mind what is the point in going through the
hassle of using a bubble level and a plum-bob to level the camera and
fix the position of the rotation..?
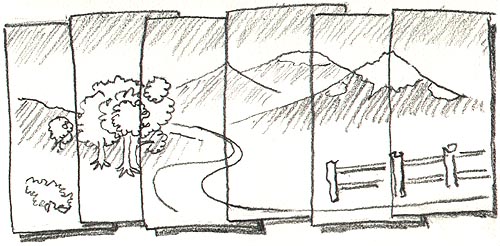
More vertical
field of view. Keeping the camera level at the same angle between each
exposure will give you more vertical field of view, this is because
final panorama image requires image all along the image, so if one image
is out of alignment it will also reduce the vertical field of view.
This makes a big difference when printing images where we always like
to have them fill the paper as much as possible. also when putting them
online as a interactive panorama it allow the viewer to look more up
and down in the panorama.
Getting
the most from your digital camera
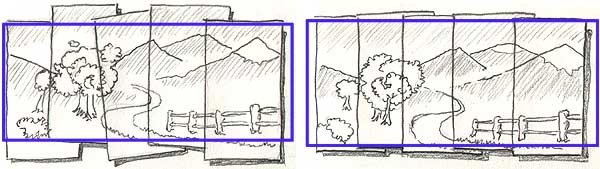
 One
problem with most digital cameras are the limited wide-angle lenses
available, because of that it is critical to keep the camera perfectly
level when photographing the panorama, to prevent jumbled frames which
will reduce the vertical field of view resulting from a already limited
lens. However it is also worth understanding the nature of the stiching
software. The pictures are captured "flat" rectalinearly by
the camera, and they would not fit together if printed and simply taped
together. Because of this the software distort the images by squessing
the edges on each side of the images. When stiching the result is kind
of the same as if you had jumbled frames, the software will trim the
final panorama along the deepest pits and throw away everything outside
of that. You can preview what you will really get in your panorama by
looking at the corner of the frames, they are going to be the limit
to what you can see vertically. I often are excited to see how much
I can see in the center, but when I turn the camera I realize that the
fov is not as much as I had hoped for. One
problem with most digital cameras are the limited wide-angle lenses
available, because of that it is critical to keep the camera perfectly
level when photographing the panorama, to prevent jumbled frames which
will reduce the vertical field of view resulting from a already limited
lens. However it is also worth understanding the nature of the stiching
software. The pictures are captured "flat" rectalinearly by
the camera, and they would not fit together if printed and simply taped
together. Because of this the software distort the images by squessing
the edges on each side of the images. When stiching the result is kind
of the same as if you had jumbled frames, the software will trim the
final panorama along the deepest pits and throw away everything outside
of that. You can preview what you will really get in your panorama by
looking at the corner of the frames, they are going to be the limit
to what you can see vertically. I often are excited to see how much
I can see in the center, but when I turn the camera I realize that the
fov is not as much as I had hoped for.
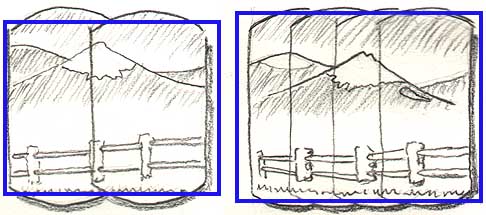 One
way around this Field of View robbing distortion problem is taking more
images, instead of over lapping app 1/3 try something like 2/3 or 3/4
overlap, this will add a lot to the top and buttom of the panorama.
Normally 12 frames will get your around 360 degrees, however you will
get more field of view by photographing 18 or 24 frames. Another advantage
is that the stiching software will be able to match the images together
better, because there are less distortion in the center of the frame,
which means that you will get less problems with things which normally
causes problems such as tiles on the floor, brick walls, and branches
close to the lens. One
way around this Field of View robbing distortion problem is taking more
images, instead of over lapping app 1/3 try something like 2/3 or 3/4
overlap, this will add a lot to the top and buttom of the panorama.
Normally 12 frames will get your around 360 degrees, however you will
get more field of view by photographing 18 or 24 frames. Another advantage
is that the stiching software will be able to match the images together
better, because there are less distortion in the center of the frame,
which means that you will get less problems with things which normally
causes problems such as tiles on the floor, brick walls, and branches
close to the lens.
Stiching
the images into a Panorama
Once you are
done photographing you should have a series of images which covers either
a partial panorama or a complete panorama. The easiest way to put them
together is using a software application created for this purpose. Currently
my favorite for web panoramas is "Photo Vista" from MGI
Soft, it is VERY easy to use, inexpensive, and delivers great results.
The software stiches from left to right, so it is easier to use if you
photograph rotating from left to right, this allows you to import the
images in one move, however you can also import them one at a time if
you photographed the other direction.
Another excelent
panorama software is the Panorama
Factory created by John Strait. This is shareware and will cost
you $35.
Finally one
of the most advanced image stichers on the market is Freeware, but it
is positively for experts. It is called Pano
Tools and are created by Helmut Dersch in Germany, I can highly
recomend this tool which allows the user to do much more than just stiching
images, it also allows you to unwrap fisheye images into panoramas and
many other things.. You can buy a graphical user interface called PTgui
which makes it a lot easier to work with Pano Tools.
My
light-weight easy to use bracket for the Nion FC-E9 and FC-E8 fisheye
lenses
Click
to see video with step-by-step instructions for handheld panoramas
Click
here to return to the Panorama photography page
Resources:
PTgui
- Probably the very best stitcher on the market. Highly Recomended
PanoGuide.com
The source for anything Panoramic
Pano
Tools very advanced freeware sticher by Helmut Dersch
VRi oneshot panorama lens
Non Panoramic Multible exposure Resources
RoundShot the original
no stiching pano camera
PanoScan, the digital
pano camera
Orthographic
Photography
Multible exposure
highrez images
|